The preparation
Prepare well
Find the right name of your E-shop / Domain
Reassure your customers
Managing your E-shop
The product page
Product showcase
The price
Payment solutions
Finding reliable suppliers
Legal notices / Conditions of use
Honoring your orders / Negotiating / Finding shipping suppliers
Stock management
Returns management
Start up
Marketing Efforts
SEO
Set up your WebSelf E-Shop
Add an E-shop
Manage your E-shop
Orders
Catalog
Products
Categories
Shipping
Coupons
Settings
General
Taxes
Stock
Currencies
Payment
Pages
______________________________________________________________________________
Have you always dreamed of having your own E-shop? You want to diversify your products/services and sell internationally? Do you want to increase your monthly income?
WebSelf has developped the guide '' How to create and succeed your online store '' in order to accompany you in all aspects of your approach! Ready to start?
![]()
Prepare well
Before you begin, it is important to look at the competition in your market and study it to see what competitive advantage you can bring to the table. Analyze your strengths and weaknesses while putting in place a successful strategy to stand out.
Before officially launching your E-shop, make sure you have a clear picture of your business: managing your inventory, budget, recurring costs, shipping, payment methods available, advertising, target customers, etc. This may seem like a lot to plan, but on the other hand, it is crucial to be very well prepared before making the big jump!
You do not want to find yourself in unfortunate situations with disgruntled customers right from the start!
A good way to make sure you are 100% ready is to create a business plan with a clear picture of your business right from the start. Also do a market research, to analyse your competitors and your target market.
Find the right name for your E-shop / Domain
An important step in the development of your E-shop is to find a name for your store, or for your domain name. Ideally, you should find your store name in your domain name, so that it is easier to find you by potential customers.
Reassure customers
A significant portion of consumers still do not buy online. Why? The
Most of the time it is not a technological issue, but a matter of trust. They are afraid of problems related to delivery, security of their banking information or they are afraid of being scammed. It is therefore important to reassure the client and build trust between him and you. It is necessary that the design of your site is professional in order to give him confidence, but also, and above all, it is necessary to find some elements which can reassure him like a description of your company, the policies of refund, the opinions of the satisfied customers, etc. Do not forget your contact information: it is essential to find the name of the company, an address, your e-mail address, a phone. These elements validate the seriousness of your company.
A good way to reassure customers from the outset is to set up Frequently Asked Questions (FAQs) with frequently asked questions and their answer, accessible to your visitors. This page should be easy to access and answer the most relevant questions from your potential customers. However, you must also be available to answer any other questions, whether by chat, email or phone. Payment is also a hotspot for customers, it must be indicated that it is secure.
It will be discussed in more detail below, under the 'Payment' tab.
This step should take a long time: brainstorm, brainstorm several ideas, and talk to others or deal with an agency. Choose a brand name that represents you, and that will be memorable. When you find the ideal name for your store, make sure it is not already taken or that the desired domain name is available.
![]()
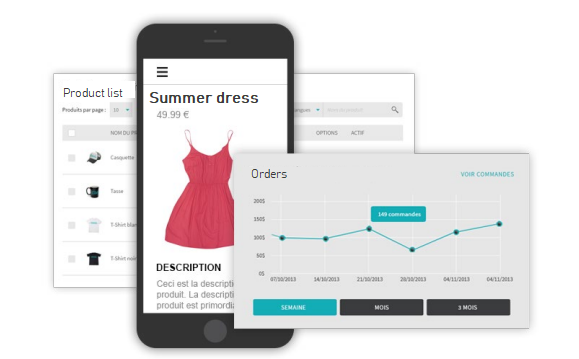
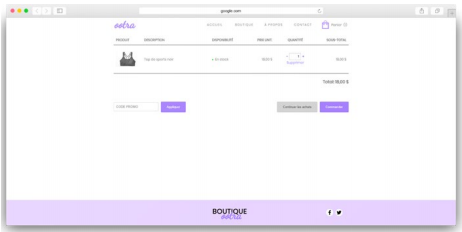
The product page
The central element of your E-shop is the product, whether is physical or digital. The product is found in what is called a ¨Product page¨, which is a detailed page. This page has a real role of "Seller" for your site. It must make visitors want to click on the call to action button "Add to cart". On this page, you must mention all the required information related to the product including size and price, as well as other relevant information eg. material, origin, etc.
In addition to the seller role, product pages are the main SEO source for products. It is therefore important to work the text content to improve the position of your products on research engines. Do not forget to include keywords!
Bref, used this page to seduce the customer, improve your conversion, and positioning on search engines!
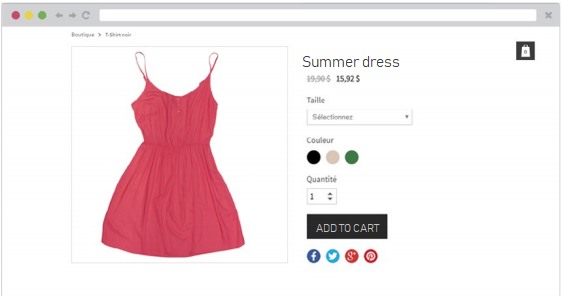
Product showcase
How to showcase the value of your product in this famous page? There are different things to consider like aesthetics and marketing actions.
Marketing actions: Do not forget, this product page will become a seller of your product! Without writing endless texts, make sure you have entered the required information, taking care to include keywords that will be relevant for your SEO. In short, when your customers see this page, they should not have any additional questions about the product itself. Be diligent and write a product page for each of your products. It is a difficult task, but one that will certainly be worth it.
Aesthetics: The visual is very important. This is why your images must represent the seriousness and professionalism of your business. So you need professional photos that showcase your product. In particular, it is important to have your flawless images. There are different tools to do this, but you can also go through a photographer whose job it is to highlight your merchandise.
The price
You must be clear about the fees right from the start. If your product listing does not contain the price, customers will simply go elsewhere. The price is a very important element: E-shop visitors prefer to be informed in advance than got surprised when proceeding to payment. It is therefore important to mention your prices clearly. If you decide to offer a discount on a certain product, do not forget to enter it in the product page (with the original price), or to have an entire section devoted to sales on your site! It's best to be honest and clear about price, shipping, taxes, etc., up front to avoid unhappy customers.
Payment solutions
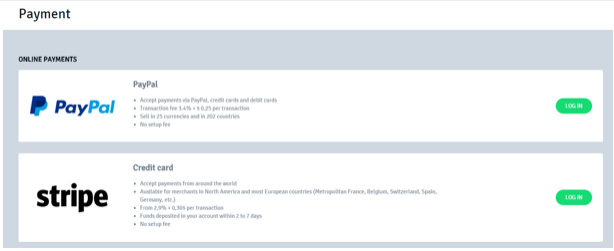
To ensure a good customer experience, you must offer several payment solutions. Nowadays, the most common method of paying online is by credit card. But, it's not the only one. In fact, people like to have a choice, so if it's possible for you, give them the opportunity to pay by PayPal, checks, etc.
If you offer several payment methods, you must be diligent and well organized. Make sure you have received the payment before processing the order and above all, do not send anything until you have received the payment, in full! This can avoid many cases of non-payment or fraud.
Speaking of fraud, we mentioned a little earlier that payment is a point that makes many people hesitate to do their shopping online. That's why you need to rassure your customer by any means possible, by mentioning that you offer secure payments. Also make sure your site has the HTTPS protocol, which will reassure the customer that your website is safe. Build trust from the start with your customers, and offer support when they are hesitant.
Find reliable suppliers
To avoid problems, it is better to trust reliable and recognized suppliers, who will provide a good service for you and your customers. This step is not to be rushed, because you can find yourself in bad situations. Start slowly performe tests before onboarding a new supplier: Trust in a relationship must be built little by little.
Legal notices / Conditions of use
When we have a site, and even more when it comes to an E-shop, there are laws to respect and they must be put in place. These laws differ from country to country, so it is important to learn what steps to take.
There are elements that are mandatory in most of the country, such as the general conditions of sale, the withdrawal period, clear information on fees and delivery methods, etc.
In order to be sure to respect all these elements, it is important to consult the organizations that manage these aspects in your country or to consult a lawyer who will be able to tell you all the measures you must take.
Honouring your orders / Negotiating / Finding shipping suppliers
Once the customer has paid, another adventure begins: ¨Shipping¨. After payment, the customer has only one wish: to get the product delivered as soon as possible and at the lowest cost. The longer the customer waits, the more unhappy he/she will get. It is therefore crucial to reduce this waiting time, and therefore consider ¨shipping¨ as a key aspect of your success.
Different approaches exist, you might choose to ship each order as soon as it is paid, but that can take a lot of time. Or choose to ship orders once or twice a week, or every 1st and 15th of the month (depending on your activity and your sales volume). It's up to you to find the right compromise on this. No matter what choice you make, keep in mind to be transparent with your customer and explain clearly the deadlines. Thus, your customers know how long they will have to wait.
You must also find the right shipping company. There are, of course, national companies like La Poste in France, Canada Post in Canada, etc. Generally, if you reach a certain volume, it is possible and preferable to enter into a contract with these companies. You will be billed once a month, instead of every shipment. You can also go through companies specialized in fast deliveries like DHL, UPS, Fedex, etc.
In terms of satisfaction, it is always relevant to offer a variety of shipping options. Your customer will be able to choose according to their needs, like the shipping address, the type of shipping (Express,regular, etc.), returns or exchanges fees. Shipping the package at home remains by far the preferred method of customers.
Talking about your image, it is important to have quality packaging. This will be important in the first place to secure shipments, but also to project a positive image of your website.
Stock management
Inventory management is very important in e-commerce, it requires discipline. Indeed, stock issues, just like in a physical store, are quite possible on the Internet. Not to mention that a shortage of stock may lengthen the delivery time and make customers unhappy.
The simplest solution is to display a product only when you have it in stock. Nevertheless, if you remove it since it is no longer in stock, it won't longer be displayed and that will note be good for the referencing of your product. It is more interesting to leave it visible, but to prevent the addition to the cart.
If you are afraid of running out of stock, you can prevent the purchase of a specific product as soon as it reaches a certain quantity. This will limit the risks.
We must avoid falling into the opposite excess and have everything in overstock. Not only because it is associated with a cost, to buying more products than necessary, requires the capacity to store it. And finally, the overstock of a product might force you to lower prices and / or clear the items in question to make room, and thereby reduce your profit margins.
Finally, we must not forget that depending on the country (this is particularly the case in France) the tax law requires companies to perform at least one inventory per year.
Managing returns / refunds
You care about your clients' satisfaction and even if you have detailed your products price and features, expect to receive refund requests. Indeed, sometimes issues arise, either with the package, the product, etc. The customer has the right to a withdrawal period, which may vary depending on the country or type of product, without having to justify reasons or to pay penalties. In France, this period is 14 days since 2014.
It is therefore crucial to put in place a simple and easy returns / exchange policy.
![]()
Marketing Efforts
You can work hard on a visually impeccable and functional E-shop, but if you have no traffic, your efforts will unfortunately lead to nothing. There are many ways to bring customers to your E-shop but know that you will need to make some marketing efforts to achieve this.
Social networks: It is very important to be present on other platforms than your website.
So you can make inbound and outbound links to your E-shop, as well as announce
to your customers or potential customers), your news, sales, special announcements, opening hours, refund policy, etc.
Advertising: It might be nice to have a budget for advertising, since nowadays you cannot rely on word-of-mouth alone. Fortunately, there are several very inexpensive ways to advertise. On your social networks, for example, you have full control over the budget as well as the audience that you wish to reach. There are also several forums or Facebook pages where you can promote your E-shop: people need to know!
Contest/Promotions: When you are a start-up company, your first goal should be to make yourself known, more specifically to your target audience. A good way is to offer promotions on first purchases, contests on Facebook, or discounts on shipping fees! Be creative!
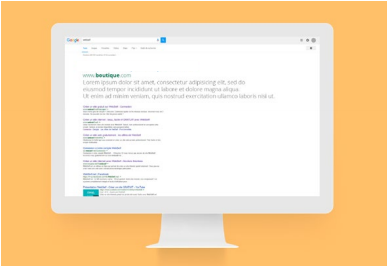
SEO
On the same topic, if you spend so much time making sure your E-shop is complete and functional, you need to make sure people can access it easily. There is, like marketing, a lot of effort to be made to maximize your ranking on search engine results.
First, make sure you have a title and a small description for each of your images, this is called the Alt attribute. Then write your content carefully by adding keywords. Avoid duplicate content at all costs, since Google and other search engines will punish you severely! If you see an E-shop selling the same products as you, or if the manufacturer of the product sells online as well, make sure you have a different product description!
Increase the links pointing back to your site (backlinks): this will increase your notoriety, and you will be taken seriously by the search engine bots! Create partnerships, collaborations, create a blog with posts that can be shared, subscribe to print or online directories, etc. For more articles on SEO, I invite you to read the following articles:
SEO in 2018: what are the priorities?
E-commerce: Essential tips to improve your SEO
How to write your website content for better SEO
SEO optimization: 5 useful tools
How to improve the SEO of your site with images
![]()
Add an E-shop
With WebSelf, create an E-shop is easily. Adding an E-shop to your site will allow you to make sales online directly from your WebSelf site. To add an E-shop, click on the 'Shop' tab in the Management Bar. That's it, your online store has been created! You just have to add items, images, payment methods, currencies and manage your stock!

Please note that the shop page will have, by default, 4 articles. To edit these articles, please see the section below, 'Manage Your E-shop'.
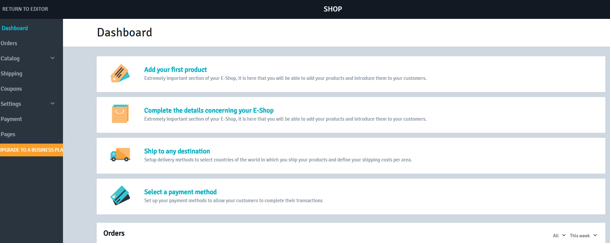
Managing your E-shop
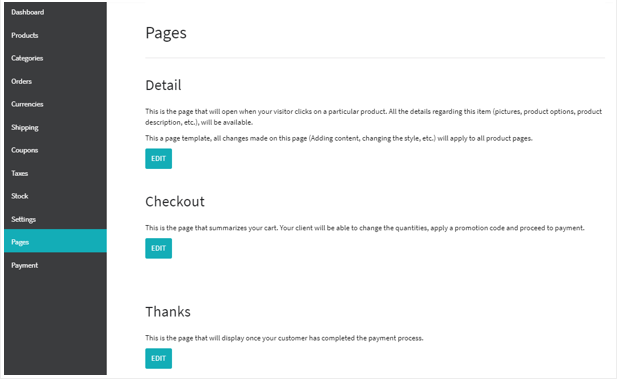
Webself offers you the ability to manage your E-shop easily from your dashboard. Go to the the left column of the 'Shop' tab, to view the following Settings:
Dashboard: See the steps to get your shop up and running. You can also track your orders, top 5 products and categories as well as sales trends.
Orders: Manage your orders.
Catalog:
Products: Easily modify or add products.
Categories: Easily edit or add categories.
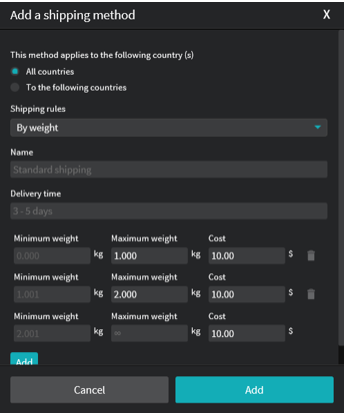
Shipping: Set up the shipping methods for your products.
Coupons: Create coupons for your products.
Settings: Enter your business general information.
General:
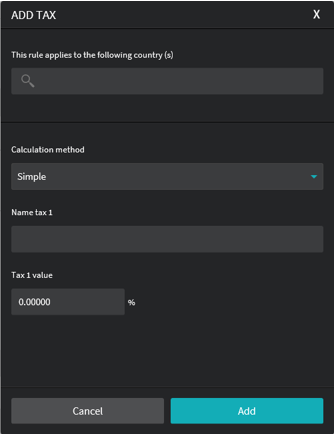
Taxes: Set up applicable taxes on your products.
Currencies: Set up currencies on your E-shop.
Stock: Manage your stocks.
Payment: Set up payment methods on your E-shop.
Pages: Customize your communications with your customer.
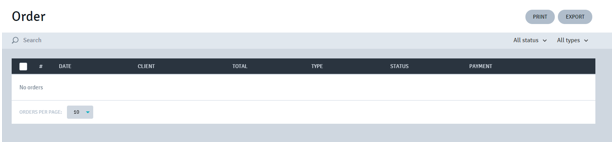
Orders
In the 'Orders' section you find the list of all your orders. Each time a customer places an order, a line will be added.
In the Orders section, you can choose:
1. Orders per page: How many orders to display per page in the list.
2. Order Status: Filter your orders by: All, Canceled, Pending, Payment Fail, Completed, Shipped
3. Search Bar: Search for a particular invoice
Catalog
In the "Catalog" section here are your options:
Products
It is in this section you will be able to add and modify your products.
First, you will need to click on 'Add product'.

Then, under the 'Product Information' tab you will be able to modify the product information:
1. Product name.
2. Product description.
3. Product type (physical or digital).
4. Code (Only if you use codes to identify your products).
5. Price.
6. Weight.
7. SKU (Stock keeping units).
8. Tax(es).
9. Shipping fees.
In the sub-tab 'Images' you can select the image (s) for your product. You can choose images from your computer or from the image library.
In the 'Category' tab, your categories will be displayed. So you can check the box of the category,
sub-category or sub-category in which you want the product to be displayed.
In the 'Actions' sub-tab the YES button will be checked by default. On the other hand, it will be necessary to click on no when:
1. You will want to hide the product if the stock is less than
2. When the product will be out of stock
In the 'Product Activation' sub-tab, this is where you check NO if you want to deactivate your product, otherwise it will be activated by default as long as you click Save.
Categories
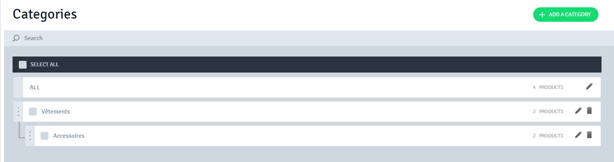
In the ¨Coupons¨ section, you can create coupons for your online store. The code can be according to a ¨percentage, fix amount or free shipping¨and it can be set up to work over a given time period, as well as a number of uses.
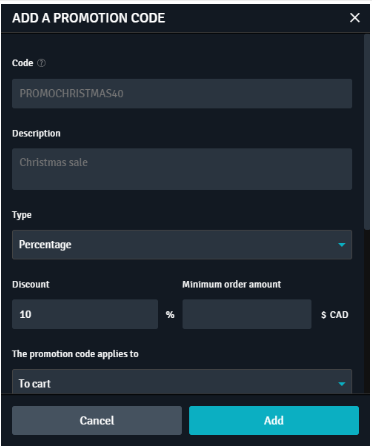
Here's how to proceed:
1. Add a coupon: Click on Add a coupon.
2. Code: Enter a name for your coupon.
3. Description: Choose an option from your coupon:
a. Percentage.
b. Fixed amount.
c. Free delivery.
4. Discount: Depending on the type of option selected, enter the discount either as a percentage or as a fixed amount and the minimum amount required to apply the coupon.
5. The promotion code applies to:
a. To cart.
b. Categories.
c. Some products.
6. Cumulable with other discounts: Allows to add this coupon to the order even if it contains products that are already subject to other discounts or promotions.
7. Availability: You can choose the number of times than the coupon can be used.
8. Starting on: This allows you to limit the active period for this promotional code.
9. End date: You can also choose a fixed end date for your coupon.
10. Active the coupon in your E-shop?: The box is checked by default. Uncheck this box to disable the use of this coupon in your E-shop.
In the 'General' section, these are your options:
In the 'Business information' section, you can enter information about your business.
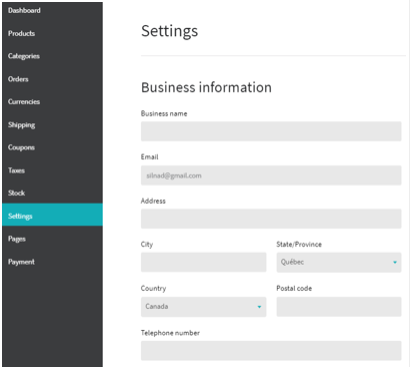
2. Email.
3. Address.
4. City.
5. State / Province.
6. Country.
7. Postal code.
8. Telephone number.

2. General terms of use.
4. Return and refund policy.
5. Shipping Policy.
In the 'General' section you can customize your invoice number by changing the prefix, the starting number or the suffix.
1. Unit of measurement: choose between two options:
a. Metric.
b. Imperial.
2. Default Unit: Depending on the unit of measure you choose, you can choose between Kg and G or Lb and Oz.
In the 'Invoice' section you can customize your invoice number by changing the prefix, the starting number or the suffix.
1. Logo: Click on ¨Add a picture¨ to download your business logo.
2. Message at the top of the invoice.
3. Message at the bottom of the invoice.
In the section 'Payment process' you can make certain fields mandatory:
1. Company name: The NO button is ticked by default
2. Telephone number: The NO button is ticked by default
3. Region (except Canada and USA): The "NO" button is marked by default.
4. Activate the default basket: the "YES" button is marked by default.
To save your configuration, click Save.
In the ¨Taxes¨ section, you can manage applicable taxes on your products.
Stock
Stock management keeps you up-to-date when managing stock quantities.
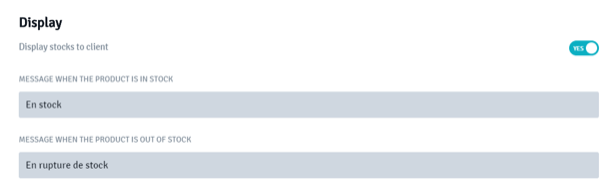
In the 'Display' section, these are your options:
1. Display stocks to clients: The ¨YES¨ button is checked by default
2. Message when the product is in stock: Enter a custom message to display, for example:
a. In stock.
b. Be quick!
c. For a limited time
3. Message when the product is out of stock: Enter your text to display a personalized message.
a. Back soon!
b. Next arrival on:
c. Not available
In the 'Actions' section, these are your options:
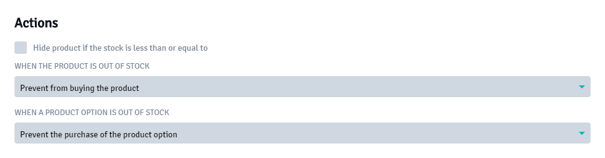
1. Hide the product if the stock is less than or equal to: By checking the box, you will be asked to enter a number. Products with a stock less than or equal to the specified number will not be displayed.
2. When the product is out of stock: choose from the 3 options
at. Allow purchasing the product.
b. Prevent from buying the product.
c. Hide product.
In the 'Notifications' section, here are your options:
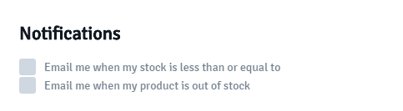
1. Send me an email when my stock is less than or equal to: By checking the box you will be asked to insert a number. You will receive a notification when your stock is less than or equal to the indicated number
2. Email me when my product is out of stock: By checking the box, you will receive a notification when a product is out of stock.
To save the settings, click on Save.
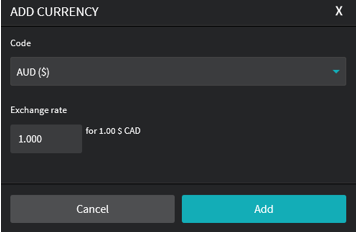
- To change the exchange rate, click on the pencil icon located at the right of the currency's name.
- To set a default currency, click on the star icon located at the right of the currency's name.
- To remove the currency, click on the trash icon located at the right of the currency's name.
Then select the desired currencies for your E-shop by checking the appropriate boxes.
1. Display code: If you use codes for your products, this will display the code of each product;
2. Activate zoom on the image: this enables you to activate the zoom on a product image, to give your customers the possibility to see your product in more detail.
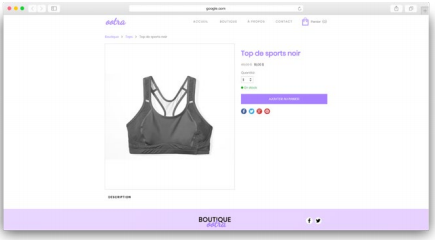
3. In the Social Networks sub-tab, the "YES" button is checked by default. These are your default options:
a. Facebook: This allows to share this product on a Facebook account;
b. Twitter: This allows to share this product on a Twitter feed;
c. Google: This allows you to share this product on a Google+ account;
d. Pinterest: This allows to share this product on a Pinterest account.
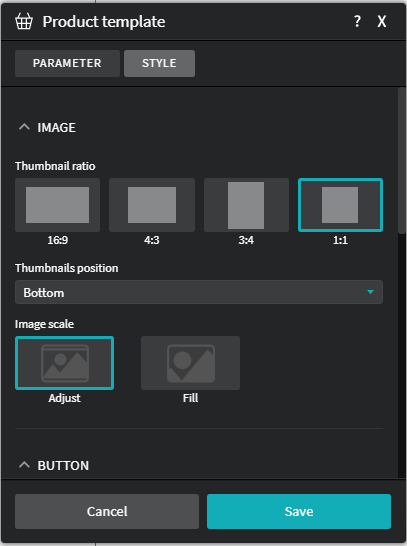
On the ¨Style¨ tab, these are your options:
In the Image sub-tab, these are your options:
1. Thumbnails proportion: Choose the proportion of the thumbnail that best fits your product. The 4: 3 format is checked by default.
2. Thumbnails position: Choose the position of the thumbnail that best fits your product: Bottom, top, left, right.
3. Image scale: Choose the scale of the image that better adapts to your product: Add or Fill.
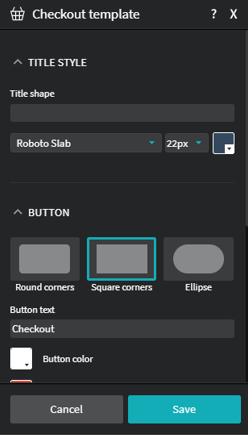
In the Button sub-tab, these are your options:
1. Format display: Choose the display format that best fits your product: Round corners, Square corners, Ellipse.
2. Text button "Add to cart": This allows you to customize the text of your button.
3. Button colour: Choose a colour for your "Add to Cart" button.
4. Text button colour: Choose a colour for your text of your button "Add to cart".
In the Product Name, Price and Product option sub-tabs, click the "NO" button to enable the following options:
a. Font.
b. Font size.
c. Font colour.
In the Description sub-tab, click the "NO" button to enable the following options:
a. Title
Font: Choose the font of the product title;
Font Size: Choose the font size of the product title;
Font colour: Choose a font colour of the product title.
b. Text
Font: Choose the font of the product text.
Font size: choose the font size the product text;
Font colour: Choose a font colour the product text.
To save your settings, click on Save.
In the 'Style' section you can configure settings, like 'Shape and Background' as well as add borders, shadow and margins.
To save your settings, click on Save.